
Introduction
Let’s face it—store-bought granola always sounds like a good idea until you flip the bag over and read the ingredients. Packed with too much sugar, preservatives, and who-knows-what-else, it’s far from the wholesome snack you were hoping for. That’s where this homemade vanilla nut granola recipe comes in. It’s easy, affordable, and so much tastier than anything you can buy.
Now grab your apron (or don’t—it’s really not that messy), and let’s get started with the best homemade granola recipe you’ll ever make.
Why You’ll Love This Homemade Vanilla Nut Granola
Better Than Store-Bought Granola: Fresh, Crunchy, and Customizable
If you’ve ever eaten store-bought granola and thought, “Meh, this could be better,” you’re not alone. That stuff is often loaded with extra junk you don’t need, like artificial flavors and oils. With this homemade vanilla granola, you’re in control of everything—right down to the level of crunch.
Not only is it fresher, but it’s also more flavorful. The combination of real vanilla extract and roasted nuts creates an irresistible aroma and taste. And let’s not forget the versatility—you can make it as sweet or nutty as you like, toss in your favorite extras, or even turn it into a gluten-free or vegan treat.
Packed with Flavor: Vanilla and Nutty Goodness in Every Bite
There’s just something about the combination of vanilla and nuts that screams comfort food. The warm, sweet vanilla flavor pairs beautifully with the rich crunch of almonds, pecans, or whatever nutty mix you prefer. It’s a snack that feels indulgent but is actually good for you (well, mostly—moderation, folks!).
Whether you’re topping your morning yogurt, grabbing a handful on the go, or sprinkling it over ice cream, this granola is a total game-changer.
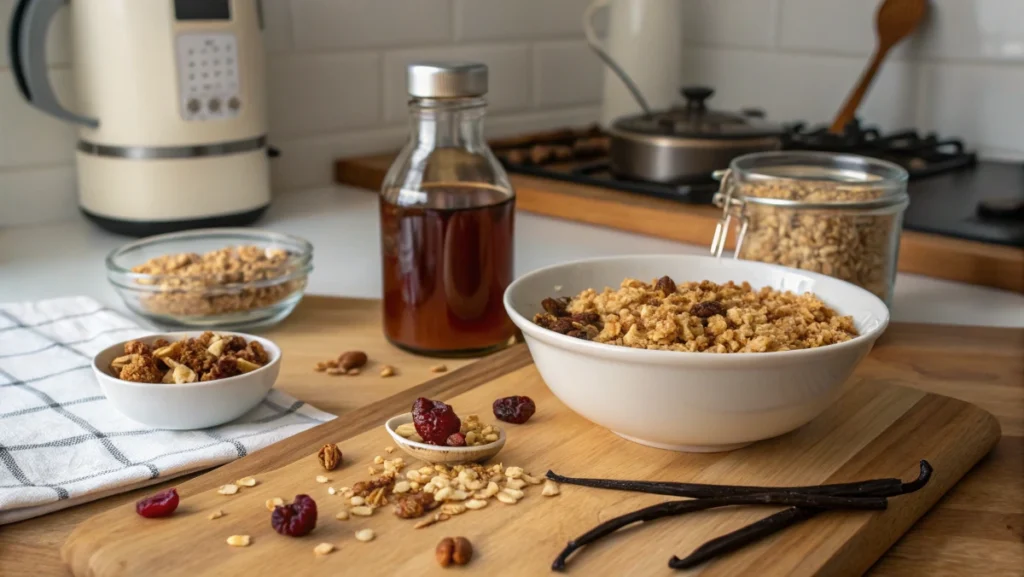
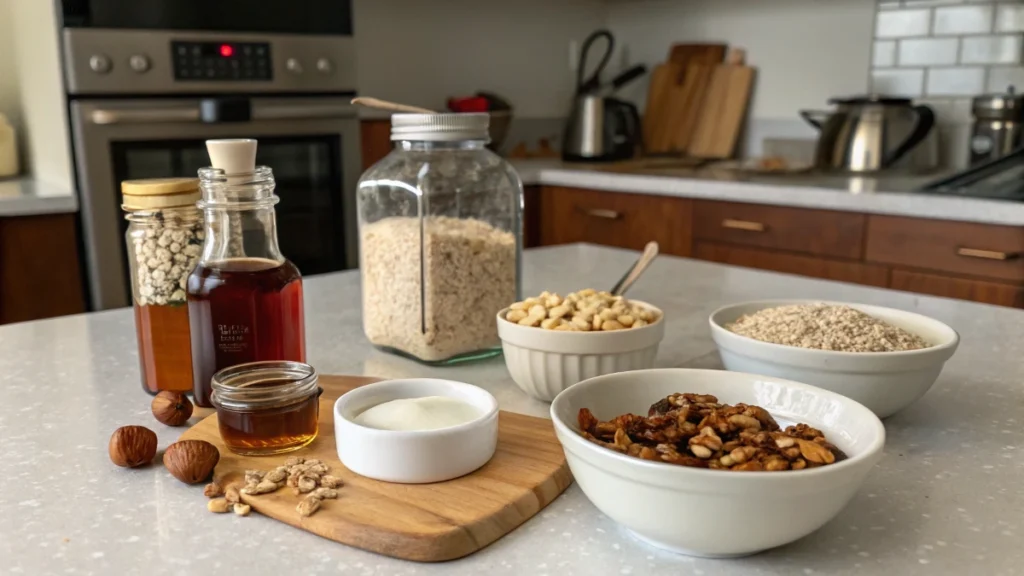
Ingredients for the Best Homemade Vanilla Nut Granola
This vanilla nut granola recipe is all about simple, wholesome ingredients that come together to create something magical. Below, I’ve listed everything you’ll need—plus a few options to make it your own!
Essential Ingredients
Here’s what you’ll need to make a batch of delicious, crunchy granola:
- Rolled Oats (3 cups): These are the foundation of any great granola. Choose old-fashioned rolled oats for the perfect texture. Avoid quick oats—they get too mushy when baked.
- Mixed Nuts (1 ½ cups): Almonds, pecans, or walnuts work great! Chop them roughly so you get a nice mix of textures in every bite.
- Honey or Maple Syrup (½ cup): Adds natural sweetness and helps the granola clump together. Honey brings a rich flavor, while maple syrup offers a hint of caramel-like sweetness.
- Vanilla Extract (1 tablespoon): The star ingredient! Use pure vanilla extract for that deep, sweet aroma that ties the whole recipe together.
- Coconut Oil or Neutral Oil (⅓ cup): Helps everything bake to golden perfection. Coconut oil adds a subtle tropical hint, but any neutral oil works.
- Brown Sugar (¼ cup): Optional, but a little brown sugar gives the granola a caramelized crunch.
- Salt (½ teaspoon): Enhances the sweetness and balances the flavors.
Optional Add-Ins for Extra Flavor
Want to make your homemade vanilla nut granola recipe even more exciting? Toss in some of these optional ingredients to mix it up:
- Dried Fruits (½ cup): Cranberries, raisins, or chopped dried apricots add a chewy, sweet contrast to the crunch.
- Coconut Flakes (½ cup): Unsweetened coconut flakes add a touch of tropical flair.
- Seeds (¼ cup): Sprinkle in chia seeds, flaxseeds, or sunflower seeds for extra texture and a nutritional boost.
- Cinnamon or Nutmeg (1 teaspoon): A dash of warm spices takes the flavor to a whole new level.
Substitution Tips for a Custom Granola Mix
- Make It Vegan: Swap honey for maple syrup to keep the recipe plant-based.
- Go Gluten-Free: Make sure your oats are certified gluten-free.
- Nut-Free Option: Use pumpkin seeds and sunflower seeds instead of nuts.
Step-by-Step Instructions for Making Homemade Vanilla Nut Granola
Now that you’ve got your ingredients lined up, let’s dive into the process of making this vanilla nut granola recipe. It’s simple, fun, and will leave your kitchen smelling like heaven!
How to Make the Perfect Vanilla Nut Granola
Follow these steps to create delicious, crunchy granola that’s bursting with vanilla and nutty goodness.
Check out do you need vanilla extract for cookies? for tips and insights.
1. Preheat the Oven for Golden Crunch
Start by preheating your oven to 325°F (165°C). A lower temperature ensures the granola bakes evenly without burning the nuts or oats.
- Pro Tip: Line a large baking sheet with parchment paper for easy cleanup and prevent sticking.
2. Combine the Dry Ingredients
In a large mixing bowl, toss together:
- 3 cups of rolled oats
- 1 ½ cups of chopped nuts (almonds, pecans, or your favorite combo)
- Optional Add-Ins: If you’re using seeds or spices (like cinnamon), add them here.
Mix everything well to ensure an even distribution of nuts and oats.
3. Prepare the Sweet Vanilla Coating
In a small saucepan (or microwave-safe bowl), gently heat:
- ½ cup of honey or maple syrup
- ⅓ cup of coconut oil
- 1 tablespoon of vanilla extract
- ¼ cup of brown sugar (if using)
Stir over low heat until the mixture is smooth and well combined. If using a microwave, heat in 15-second intervals, stirring in between.
- Pro Tip: The warm liquid helps coat the oats and nuts evenly, ensuring every bite is full of flavor.
4. Mix It All Together
Pour the warm vanilla mixture over the dry ingredients. Using a spatula or clean hands (if you’re feeling hands-on), stir everything together until all the oats and nuts are lightly coated.
- Key Tip: Make sure there are no dry spots in the mix. This is the secret to perfectly crunchy granola!
Baking Tips for the Best Granola
5. Spread and Bake for Even Crispiness
Spread the granola mixture in an even layer on your prepared baking sheet.
- Bake for 20-25 minutes, stirring halfway through to ensure even browning.
- Watch Closely: The granola is done when it’s golden brown and smells amazing.
6. Let It Cool Completely
Remove the baking sheet from the oven and let the granola cool completely on the pan.
- Why Cool? As it cools, the granola will firm up and develop its signature crunch.
Storing Your Vanilla Nut Granola for Freshness
7. Store in an Airtight Container
Once cooled, transfer the granola to an airtight container or mason jar.
- Shelf Life: Homemade granola stays fresh for up to 2 weeks at room temperature.
- Pro Tip: For longer storage, freeze in a zip-top bag for up to 3 months.
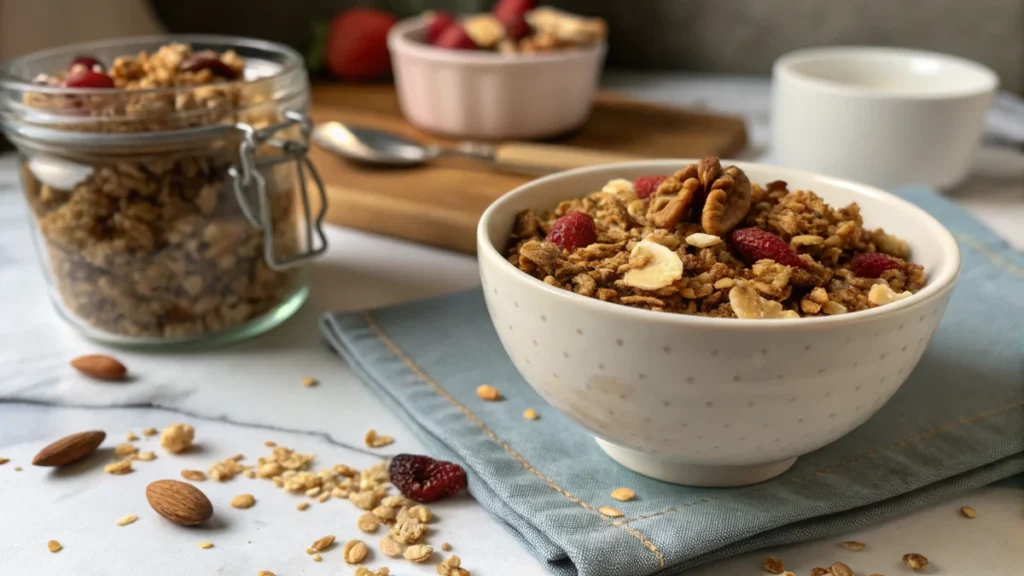
Creative Ways to Serve Your Homemade Vanilla Nut Granola
You’ve made your delicious vanilla nut granola, and now it’s time to put it to good use! This crunchy, nutty mix is so versatile—you can enjoy it in countless ways. Here are some creative serving ideas to inspire you.
Breakfast Ideas: Start Your Day with Vanilla Nut Granola
1. Classic Granola with Milk
Pour a generous scoop of your homemade vanilla nut granola into a bowl and top it with your favorite milk (almond, oat, cow’s milk—you name it!). The granola stays crunchy while soaking up just enough milk to make it satisfying.
2. Yogurt Parfait with Vanilla Granola
Layer your granola with creamy yogurt and fresh fruits like berries, banana slices, or diced apples. This makes a delicious and Instagram-worthy breakfast that feels like a treat.
- Pro Tip: Add a drizzle of honey or maple syrup for extra sweetness.
3. Smoothie Bowl Topping
Turn your favorite smoothie into a complete meal by topping it with a handful of vanilla nut granola. The crunch adds the perfect contrast to the creamy smoothie base.
- Popular combos: Try pairing your granola with a berry smoothie or a tropical blend featuring mango and pineapple.
Snack Ideas: Satisfy Your Midday Cravings
4. Grab-and-Go Granola Mix
Turn your vanilla nut granola into an on-the-go snack by mixing it with dried fruits (like cranberries or raisins) and a few chocolate chips. Toss it in a resealable bag, and you’ve got a quick, healthy trail mix.
5. Granola Energy Bites
Use your granola to make easy no-bake energy bites. Combine 1 cup of granola with ¼ cup of nut butter and a little honey. Roll into bite-sized balls and refrigerate until firm. These are perfect for a quick snack or lunchbox addition!
Dessert Ideas:
6. Ice Cream Topping with a Crunch
Sprinkle your crunchy vanilla nut granola over a scoop of vanilla or chocolate ice cream. The mix of creamy and crunchy textures is irresistible!
- Extra Touch: Add a drizzle of chocolate syrup or caramel for a dessert that feels fancy but is super easy to whip up.
7. Baked Fruit Crisp
Use your granola as a topping for baked fruits like apples, peaches, or pears. Just slice the fruit, sprinkle it with granola, and bake until warm and bubbly. It’s like an instant crumble without the hassle.
FAQ: Tips and Troubleshooting for Homemade Vanilla Nut Granola
Making homemade vanilla nut granola can be incredibly rewarding, but let’s be real—sometimes things don’t go as planned. Below, I’ve answered the most common questions to help you troubleshoot, perfect, and enjoy your granola-making experience.
Common Questions
What Ingredient Makes Granola Stick Together?
The key to getting granola to stick together is using a sticky sweetener, like honey or maple syrup. These ingredients act like a glue, binding the oats and nuts together as they bake. Additionally, adding a bit of fat, such as coconut oil, helps coat everything evenly, ensuring the clusters hold their shape. For the best results, don’t forget to press the granola mixture firmly onto the baking sheet before baking—it really makes a difference!
Why Is Homemade Granola Not Crunchy
Homemade granola can turn out soft or chewy for a few reasons, but it’s usually related to the baking process. First, if the oven temperature is too low, the granola won’t crisp up properly. Also, overcrowding the baking sheet can prevent even airflow, which keeps the granola from drying out. Stirring the granola too frequently while baking may also disrupt its crunchiness, so limit mixing to just once halfway through. Finally, letting the granola cool completely on the baking sheet is essential because it hardens as it cools.
Is Vanilla Granola Healthy?
Yes, vanilla granola can be a healthy option, but it depends on how you make it. By using natural sweeteners like honey or maple syrup and healthy fats such as coconut oil, you can keep it nutritious while still flavorful. Plus, the oats and nuts in granola provide fiber, protein, and essential nutrients, making it a wholesome addition to your diet. However, be mindful of portion sizes because even healthy granola can be calorie-dense if eaten in excess.
How to Make Granola Crunchy and Not Chewy?
To achieve crunchy granola, bake it low and slow, typically at 325°F (165°C). This allows the ingredients to toast evenly without burning. Another trick is to spread the granola mixture in a thin, even layer on the baking sheet so that everything crisps up at the same rate. Additionally, avoid adding dried fruits or chocolate chips before baking, as these can add moisture. Finally, let the granola cool completely on the pan—it will firm up as it cools, giving you that satisfying crunch every time!
Conclusion :
You’ve officially mastered the art of making homemade vanilla nut granola—how good does that feel? This recipe is the perfect balance of sweet, crunchy, and nutty, and it’s so much better than anything you’ll find in a box. From quick breakfasts to indulgent desserts, this granola truly does it all.
If you’re a granola fan (and let’s face it, who isn’t?), this recipe will become your go-to. It’s versatile, easy to make, and packed with wholesome ingredients you can feel good about. Whether you’re enjoying it with milk, tossing it into a yogurt parfait, or just grabbing a handful as a snack, this granola is guaranteed to make your taste buds happy