
Introduction to Chocolate Cake with Vanilla Frosting
There’s something magical about the combination of rich, fudgy chocolate cake and smooth, creamy vanilla frosting. It’s like the dessert world’s version of a power couple—opposites that perfectly balance each other out. Whether it’s for a birthday party, a celebration, or just because you’re craving something sweet, this duo never fails to hit the spot.
Ingredients for the Ultimate Chocolate Cake
Before you dive into baking, it’s important to get all your ingredients measured and ready. Trust me, having everything prepped beforehand makes the whole process so much smoother. Here’s your go-to list for a moist and decadent chocolate cake with silky vanilla frosting.
For the Chocolate Cake
- All-Purpose Flour: 2 cups (250g)
Gives the cake structure. Make sure to sift it to avoid lumps. - Granulated Sugar: 2 cups (400g)
Sweetens the cake and keeps it tender. - Unsweetened Cocoa Powder: ¾ cup (75g)
Go for high-quality cocoa for a richer chocolate flavor. - Baking Powder: 2 teaspoons
Helps the cake rise and stay light. - Baking Soda: 1½ teaspoons
Balances acidity and gives extra lift. - Salt: 1 teaspoon
Brings out the chocolate flavor (yes, salt makes it better!). - Buttermilk: 1 cup (240ml)
Keeps the cake moist and adds a slight tang. - Vegetable Oil: ½ cup (120ml)
Adds moisture and ensures a soft crumb. - Eggs: 2 large
Bind everything together while adding richness. - Vanilla Extract: 2 teaspoons
A must for depth and balance. - Boiling Water: 1 cup (240ml)
Blooming the cocoa powder with hot water makes the chocolate flavor shine.
For the Vanilla Frosting
- Unsalted Butter: 1 cup (227g), softened
Creates a rich and creamy base for the frosting. - Powdered Sugar: 4 cups (480g), sifted
Sweetens the frosting and gives it that fluffy texture. - Heavy Cream or Milk: 2–3 tablespoons
Adjust to get the perfect consistency. - Vanilla Extract: 2 teaspoons
Use pure vanilla extract for the best flavor. - Salt: A pinch
Balances the sweetness and enhances the vanilla.
Optional Add-Ons
- Sprinkles: For a festive touch
- Chocolate Shavings: A little extra flair never hurts!
- Fresh Berries: To make it feel fancy
Get a detailed guide on achieving the perfect balance in this step-by-step chocolate cake guide.
Step-by-Step Guide to Baking Chocolate Cake
Alright, now that we’ve got all the ingredients prepped and ready, it’s time to get baking! This step-by-step guide will walk you through the process, so your chocolate cake comes out moist, fluffy, and absolutely delicious.
Step1: Prep Your Equipment
- Preheat the Oven: First, set your oven to 350°F (175°C) and, while it’s heating up, start preparing your batter. This step is crucial for ensuring even baking, so don’t skip it!
- Grease and Line Your Pans: Next, grab two 9-inch round cake pans. Grease them thoroughly with butter or non-stick spray, and then line the bottoms with parchment paper. Not only does this prevent sticking, but it also makes removing the cakes super easy once they’re baked. Trust me, this little step makes a big difference!
Step2: Mix the Dry Ingredients
- Combine the Basics: In a large mixing bowl, whisk together:
- 2 cups of all-purpose flour
- 2 cups of granulated sugar
- ¾ cup of cocoa powder
- 2 teaspoons of baking powder
- 1½ teaspoons of baking soda
- 1 teaspoon of salt
- Whisk Well: Ensure everything is evenly combined—no clumps! The cocoa and baking soda need to mix thoroughly for that perfect rise.
Step3: Add the Wet Ingredients
- Make a Well: In the center of your dry ingredients, create a well (basically a hole for the wet stuff).
- Pour It In: Add the following:
- 1 cup of buttermilk
- ½ cup of vegetable oil
- 2 large eggs
- 2 teaspoons of vanilla extract
- Mix It Up: Using a hand mixer or stand mixer, beat the ingredients on medium speed until smooth. The batter will look thick at this stage—don’t worry, it’s supposed to!
Step4: Add the Boiling Water
- Careful Pouring: First, gradually add 1 cup of boiling water to the batter, a little at a time. Meanwhile, go slow to avoid splashes because, trust me, this stuff is hot!
- Mix Gently: Next, stir the batter until the water is fully incorporated, making sure everything is well blended. At this point, the batter will be thin—which, by the way, is totally normal and exactly what makes the cake super moist in the end.
Step5: Pour and Bake
- Divide the Batter: Pour the batter evenly between the two prepared pans. A kitchen scale can help if you want to be precise.
- Bake: Place the pans in the oven and bake for 30–35 minutes. To check for doneness, insert a toothpick into the center—it should come out with a few moist crumbs but no wet batter.
- Cool: Remove the pans from the oven and let the cakes cool in the pans for 10 minutes. Then, transfer the cakes to a wire rack to cool completely before frosting.
Pro Tip: Keep Your Layers Flat
If your cakes dome on top while baking, don’t panic! Once the cakes are completely cool, use a serrated knife to level the tops. This makes stacking and frosting much easier. Plus, you get bonus cake scraps for snacking!
How to Make Silky-Smooth Vanilla Frosting
Now that the chocolate cake layers are baked and cooled, it’s finally time to whip up the frosting that brings everything together. Honestly, vanilla frosting is like the supporting actor that always manages to steal the show—a creamy, buttery dream that perfectly balances the richness of the chocolate cake. Plus, with just a few easy steps, you’ll have a frosting that not only spreads like a dream but also tastes even better than you imagined!!
Step1: Get Your Butter Fluffy
- Start with Room-Temperature Butter: First, place 1 cup (227g) of unsalted butter in a mixing bowl. Ideally, it should be soft but not overly melty—think spreadable consistency. If it’s too hard, let it sit out for a bit longer, because this step makes all the difference later.
- Beat the Butter: Next, using a hand mixer or stand mixer fitted with a paddle attachment, beat the butter on medium speed for about 3–4 minutes. As you mix, the butter will become pale and fluffy, which is exactly what you want. In fact, this step is absolutely key to achieving that light, airy frosting we all love!
Step2: Add Powdered Sugar Gradually
- Sift and Add: Gradually add 4 cups (480g) of powdered sugar, 1 cup at a time. Sifting the sugar beforehand prevents lumps and keeps the frosting smooth.
- Mix on Low: Start mixing on low speed to avoid a sugar cloud in your kitchen (trust me, it happens!). Once the sugar is incorporated, increase to medium speed and beat until combined.
Step3: Add Vanilla and Cream
- Flavor It: Add 2 teaspoons of pure vanilla extract. If you’re feeling fancy, you can use vanilla bean paste for those little black flecks of flavor.
- Adjust the Texture: Add 2–3 tablespoons of heavy cream or milk, one tablespoon at a time, until the frosting reaches your desired consistency. For a thicker frosting, use less cream; for a fluffier texture, add more.
- Final Whip: Increase the mixer to high speed and whip the frosting for an additional 2–3 minutes. The result? A silky-smooth, cloud-like frosting that’s ready to spread.
Pro Tips for Frosting Perfection
- Taste Test: Don’t forget to taste as you go! If it’s too sweet for your liking, add a pinch of salt to balance it out.
- Color Check: If your butter had a slight yellow tint, the frosting might look more off-white than pure white. No worries—it still tastes amazing!
Optional Add-Ins
- For a Twist: Add a tiny splash of almond extract (just ¼ teaspoon) for a subtle nutty note.
- Food Coloring: Want to jazz things up? Mix in a drop or two of gel food coloring for a fun pastel hue.
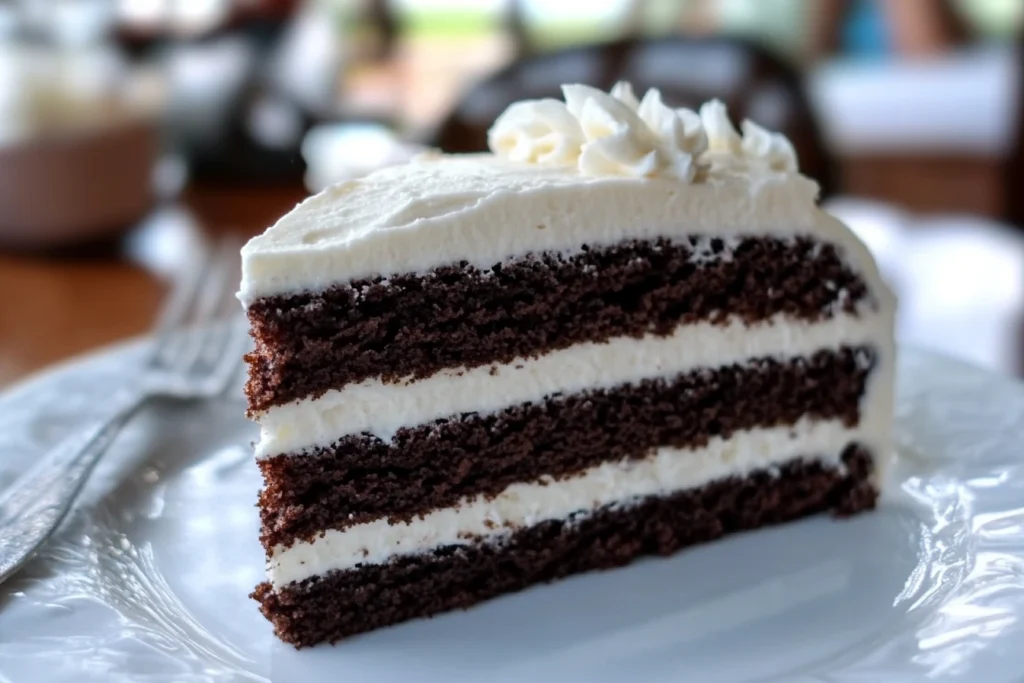
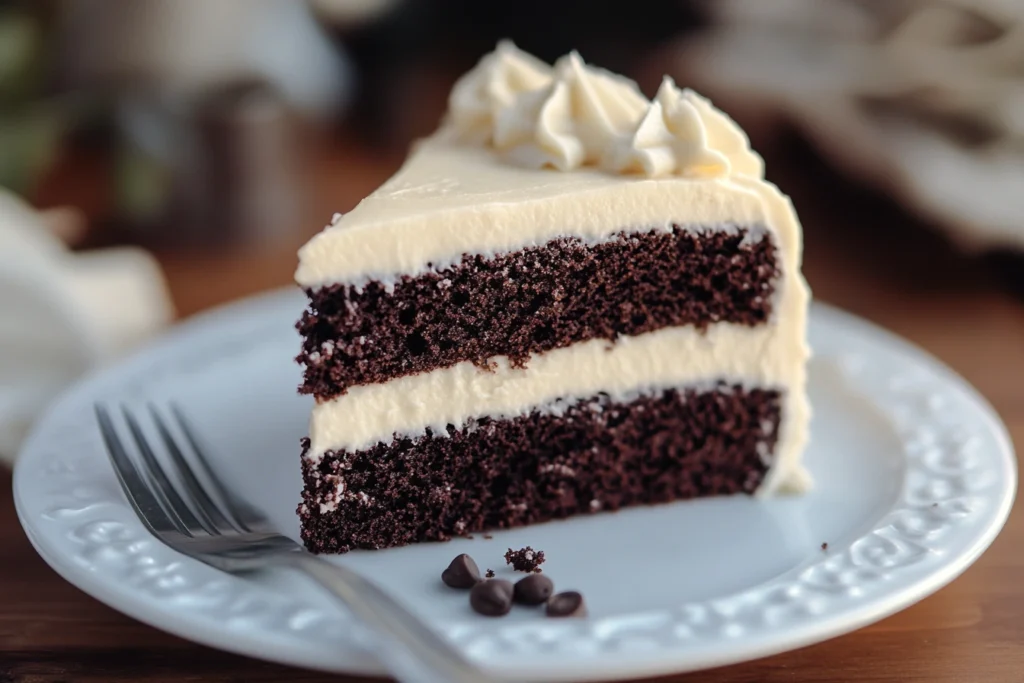
Assembling Your Chocolate Cake with Vanilla Frosting
Here’s where all your hard work comes together—turning those cake layers and frosting into a show-stopping dessert. Don’t worry if you’re not a professional baker; I’ll walk you through each step so you can create a cake that looks as amazing as it tastes.
Step1: Prep Your Cake Layers
- Trim the Layers (If Needed): If your cake layers are domed, use a serrated knife to level the tops. This ensures they stack evenly. Bonus: You can snack on the scraps while you work!
- Brush with Syrup (Optional): If you want an extra moist cake, brush each layer with simple syrup (a mix of sugar and water boiled until dissolved).
Step2: Start the Base
- Secure the Cake: Place a small dollop of frosting in the center of your cake plate or stand. This acts as glue to hold the bottom layer in place.
- Add the First Layer: Place one cake layer on the plate, cut side down, for a smooth surface.
Step3: Frost the Layers
- Add a Generous Dollop of Frosting: Scoop about ¾ cup of frosting onto the center of the first layer.
- Spread Evenly: Use an offset spatula or butter knife to spread the frosting evenly to the edges. Don’t stress about perfection—rustic cakes have charm!
- Repeat: Place the second layer on top, cut side down. Add another ¾ cup of frosting and spread evenly.
Step4: Frost the Outside
- Crumb Coat First: Apply a thin layer of frosting over the entire cake to lock in crumbs. Use your spatula to smooth it out, then chill the cake for 15–30 minutes to set.
- Final Coat: Once the crumb coat is firm, apply the remaining frosting generously. Use your spatula to smooth the top and sides.
Step5: Decorate
- Keep It Simple: Smooth out the frosting for a clean, classic look.
- Get Creative: Add sprinkles, chocolate shavings, or fresh fruit for flair. Want to pipe some frosting details? Go for it!
- Add the Final Touches: If you’re feeling extra fancy, drizzle melted chocolate over the edges for a dramatic effect.
Step6: Chill and Serve
- Chill It (Optional): If you’re not planning to serve the cake right away, go ahead and refrigerate it for up to 2 hours. Not only does this help set the frosting, but it also makes slicing so much easier when the time comes.
- Serve with Style: When you’re ready, slice and serve your masterpiece with a big smile! Plus, adding a scoop of vanilla ice cream on the side wouldn’t hurt—and, honestly, it might just make the whole experience even better!
Pro Tips for Assembling Like a Pro
Take Your Time: Patience pays off—don’t rush the frosting!
Use a Turntable: If you have one, a cake turntable makes smoothing frosting a breeze.
Warm Your Knife: Run your knife under hot water and dry it before slicing for cleaner cuts.
FAQs for Chocolate Cake with Vanilla Frosting
What Frosting Goes Best with Chocolate Cake?
The best frosting for chocolate cake really depends on your taste and, honestly, the vibe you’re going for! For instance, vanilla frosting is always a classic choice—it’s light, sweet, and perfectly balances the rich, bold flavor of the cake. On the other hand, if you’re craving something even more indulgent, chocolate frosting is definitely a crowd-pleaser. Similarly, cream cheese frosting brings a tangy twist that’s hard to resist, while peanut butter frosting offers that salty-sweet combo everyone loves. And if you’re aiming for something truly luxurious, ganache is your go-to—it’s silky, decadent, and totally unforgettable.
Can You Make Chocolate Frosting from Vanilla Frosting?
Yes, you can! If you have vanilla frosting and want to turn it into chocolate frosting, just mix in unsweetened cocoa powder a little at a time until you reach your desired flavor. You can also add a splash of milk or heavy cream to keep the consistency smooth. If you prefer a sweeter frosting, toss in a spoonful of melted chocolate instead of cocoa powder.
Why Add Vanilla to Chocolate Cake?
Vanilla might seem like an odd addition to chocolate cake, but, honestly, it’s a total game-changer. For starters, it enhances the overall flavor by adding depth and balance. While chocolate on its own can sometimes be intense or slightly bitter, vanilla brings a subtle sweetness and aroma that, in turn, rounds it out beautifully. In fact, think of vanilla as the secret ingredient that not only complements but also makes the chocolate flavor truly pop.
Conclusion for Chocolate Cake with Vanilla Frosting
Chocolate cake with vanilla frosting is a timeless combo that, honestly, never disappoints. Plus, the rich chocolate layers and creamy vanilla frosting work together to create the perfect balance of flavor and texture. Whether you’re celebrating a special occasion or just treating yourself, it’s always guaranteed to be a hit. So, go ahead—grab a slice, savor the sweetness, and enjoy every bite because, let’s face it, you’ve totally earned it!